Soups & Stews
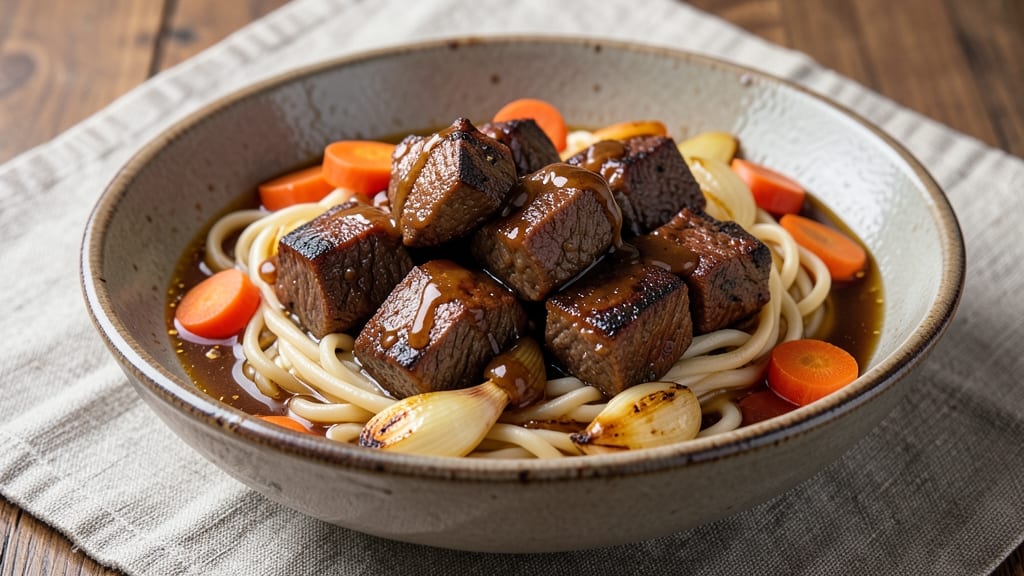
This beef and noodles pressure cooker recipe transforms tough cuts into melt-in-your-mouth beef and perfectly cooked noodles in just 30 minutes. The secret lies in high-pressure cooking, which breaks down collagen and infuses every bite with rich, savory depth.
I've perfected this method to ensure your beef stays tender while the noodles maintain their al dente texture—no soggy strands here.
The process is straightforward but delivers restaurant-quality results. You'll start by searing the beef to lock in flavors, then pressure cook it with aromatic vegetables and a simple broth.
The noodles cook directly in the pot, absorbing the flavorful liquid as they go. This method eliminates the need for long simmering times, making it ideal for busy weeknights.
What you'll end up with is a hearty bowl of beef and noodles where each forkful delivers perfectly tender beef, al dente noodles, and a deeply flavorful broth. The pressure cooker ensures even cooking and maximum flavor extraction, turning simple ingredients into a satisfying meal.
This recipe is a game-changer for anyone who wants a quick yet deeply flavorful dinner.
Whether you're feeding a family or meal prepping for the week, this method delivers consistent results every time. The beef remains juicy and tender, while the noodles stay firm and delicious. Let's get started on creating this comforting, pressure-cooker-perfected dish that's sure to become a household favorite.
Ingredients for beef and noodles pressure cooker
Simple ingredients that transform into melt-in-your-mouth beef and al dente noodles in one pressure cooker cycle.
| Ingredient | Amount | Notes |
|---|---|---|
| Chuck Roast 🥩 | 1 ½ lb | Cut into 1.5-inch cubes |
| Egg Noodles 🍜 | 8 oz | Uncooked, medium width |
| Yellow Onion 🧅 | 1 whole | Chopped into 1-inch pieces |
| Carrots | 2 medium | PEELED AND CHOPPED INTO 1-INCH PIECES |
| Garlic Cloves 🧄 | 4 cloves | Minced for depth |
| Beef Broth 💧 | 2 cups | Low-sodium preferred |
| Tomato Paste 🍅 | 2 tbsp | For umami richness |
| Soy Sauce 🍶 | 2 tbsp | For savory depth |
| Worcestershire Sauce 🍶 | 1 tbsp | Vegan version if needed |
| Dried Thyme 🌿 | 1 tsp | Earthy aroma |
| Black Peppercorns 🌶️ | ½ tsp | Freshly cracked |
| Olive Oil 🫒 | 1 tbsp | For searing |
| Salt 🧂 | 1 ½ tsp | Kosher preferred |
The chuck roast is non-negotiable here—it's packed with connective tissue that melts into tender perfection under pressure. Costco or Walmart usually carry it pre-cut, but if you're buying a whole roast, ask the butcher to cube it for you. Look for pieces with good marbling (those white streaks of fat)—that's where the flavor hides. The egg noodles? Barilla or De Cecco are my go-tos—they hold up better to pressure cooking than cheaper brands. No need to break them; just toss them whole into the pot. Carrots and onions? Organic from Trader Joe's if you want to splurge, but regular store brands work fine—just peel and chop them into even-sized pieces so they cook at the same rate.
No soy sauce? Coconut aminos works in a pinch, though it's lighter in flavor. Worcestershire giving you trouble? Substitute an extra tablespoon of soy sauce plus 1/2 teaspoon of balsamic vinegar—it's not identical, but close. Fresh thyme is ideal, but dried at one-third the amount does the trick. The tomato paste? Trader Joe's squeeze tubes are perfect—no waste, and they keep for months. Black peppercorns? Toast them lightly in a dry pan before grinding for extra depth. And if you're watching sodium, use low-sodium beef broth—trust me, your taste buds will thank you.
This dish reheats even better than it tastes fresh—honestly, the flavors meld overnight. Store leftovers in an airtight container for 4-5 days, or freeze portions for up to 3 months. I double the recipe and freeze half; it's perfect for lazy weeknights. The noodles will get mushy if reheated with extra liquid, so add a splash of broth when warming and cover tightly. And if you're prepping for a crowd, use a 6-quart pressure cooker—this recipe scales perfectly.
Why You'll Love This Recipe
- One-Pot Magic: I dump everything in—chuck roast, noodles, onions, carrots, garlic—and walk away. The pressure cooker does all the work while I make coffee or fold laundry. No skillets, no pans, no stress.
- Rich Without Effort: That chuck roast turns tender and juicy, almost falling apart, while the noodles soak up the savory broth. Honestly, the garlic and carrots caramelize just enough to add depth without extra work. It’s the kind of flavor that makes you pause mid-bite.
- Lunchbox Hero: Between us, this is my go-to for meal prep. I double the batch, let it cool, and pack it for lunches all week. The noodles stay al dente, the beef stays moist, and nobody complains—even my picky teenager.
- Budget Stretch: A pound of chuck roast feeds four for under $10, and the rest of the ingredients cost pennies. It’s the kind of meal that makes grocery day feel like a win. Plus, leftovers reheat like a dream—no dry beef here.
Step-by-step instructions for pressure cooker beef and noodles
Here's how to transform tough chuck roast into fork-tender beef while keeping noodles perfectly al dente—all in one pot.
Sear the Beef for Maximum Flavor
Set your pressure cooker to "Sauté" mode and heat the 1 tablespoon olive oil over medium-high heat until shimmering. Add the 1.5 lb chuck roast, cut into 1.5-inch cubes, in a single layer without overcrowding. Let each piece sear for 2-3 minutes until developing a deep golden-brown crust. This step builds flavor through the Maillard reaction—don't rush it or the beef will steam instead of brown.
Once the first batch is browned, remove the beef with a slotted spoon and set aside. Repeat with the remaining beef in batches, adding more oil if needed. You're aiming for golden-brown sear marks on every piece—this ensures rich flavor that infuses the entire dish. Keep the browned bits in the pot; they'll form the base of your sauce.
Build the Aromatic Base
Add the 1 whole yellow onion, chopped into 1-inch pieces, and the 2 medium carrots, peeled and chopped into 1-inch pieces, to the pressure cooker. Cook for 3-4 minutes until the onions soften and begin to caramelize slightly. Stir occasionally to prevent burning.
Add the 4 cloves garlic cloves, minced, and cook for 30 seconds until fragrant. Here's where it gets good—stir in the 2 tablespoons tomato paste, 2 tablespoons soy sauce, 1 tablespoon Worcestershire sauce, 1 teaspoon dried thyme, and 0.5 teaspoon black peppercorns. Cook for 1 minute to toast the spices and deepen their flavors. This aromatic base forms the flavor foundation for your entire dish.
Pressure Cook to Perfect Tenderness
Pour in the 2 cups beef broth and scrape up any browned bits from the bottom of the pot with a wooden spoon. Return the seared beef to the pressure cooker. Secure the lid and set to high pressure for 20 minutes. This cooking time transforms tough chuck roast into fork-tender beef that practically falls apart.
While the pressure cooker does its work, prepare the 8 oz egg noodles according to package instructions but cook them for 1 minute less than recommended. Drain and set aside, covered, to keep warm. The pressure cooker will finish cooking the noodles perfectly when combined with the beef later.
Finish and Combine for Perfect Texture
Once the cooking time is complete, allow the pressure to release naturally for 10 minutes, then quick-release any remaining pressure. Carefully remove the lid and stir the beef mixture. The beef should be fork-tender with no resistance when pierced. If needed, cook on high pressure for an additional 2-3 minutes until perfectly tender.
Add the cooked noodles to the pressure cooker and gently stir to combine. The residual heat will finish cooking the noodles to al dente perfection while absorbing all that rich beef flavor. Taste and adjust seasoning with the 1.5 teaspoons salt if needed—this dish should be savory and well-balanced, not bland or overly salty.
Rest and Serve with Confidence
Let the beef and noodles mixture sit off the heat for 5 minutes to allow the flavors to meld completely. This resting period ensures every bite delivers maximum tenderness and flavor. The noodles should be al dente with a slight bite, while the beef remains juicy and fork-tender.
Serve immediately, garnished with additional fresh thyme if desired. Each bite should offer a perfect balance of tender beef, hearty vegetables, and flavorful broth. This method guarantees you'll achieve restaurant-quality beef and noodles in under 30 minutes—no tough beef or mushy noodles in sight.
Pro Tips For Making Beef And Noodles Pressure Cooker
- SEAR THE ROAST FIRST: Chuck roast won’t tenderize if it’s just simmered—crank the heat to medium-high and brown it in 2-3 minutes per side before adding liquids. The crust locks in flavor and keeps the meat from turning mushy later. (Yes, even if you’re impatient like me, don’t skip this.)
- CUT ONIONS INTO SLICES: Dice them and they’ll disappear into the broth. Thin half-moons stay visible and soften just enough to add sweetness without turning to paste. I learned this the hard way—my first batch looked like a mystery stew.
- DON’T OVERFILL THE POT: Fill the pressure cooker no more than halfway with liquid—any more and you’ll end up with soggy noodles and a watery mess. The steam needs room to build pressure, not fight for space. (Your future self will thank you.)
- ADD NOODLES LAST: Toss them in raw during cooking and they’ll turn to mush. Instead, cook them separately for 2-3 minutes in the broth at the end—just enough to heat through and soak up flavor. Sounds weird, but it works: perfect texture every time.
Troubleshooting great beef and noodles pressure cooker
Beef Too Tough
If your beef ends up chewy instead of tender, it likely didn't cook long enough. Chuck roast needs 20-25 minutes at high pressure to fully break down. I've found that using a meat thermometer helps—aim for an internal temp of 203°F (it'll read higher due to residual heat).
If it's still tough, extend cooking by 5 minutes and check again. Never rush this step—the pressure cooker is your secret weapon for tenderizing. 💪
Noodles Too Soft
Overcooked noodles happen when they absorb too much liquid. To prevent this, cook them 1 minute less than package instructions before adding to the pot. The residual heat from the beef mixture will finish them perfectly.
If they still seem undercooked, add ¼ cup hot broth and let sit covered for 2 minutes. Pro tip: Use fresh egg noodles (like Barilla) instead of dried—they hold up better to pressure cooking. 🍜
Broth Too Thin
A watery broth usually means too much liquid was added. This recipe is designed with 2 cups broth for perfect consistency. If yours is thin, reduce it by simmering uncovered on high heat for 3-4 minutes—just enough to evaporate excess moisture.
For extra richness, stir in 1 tablespoon cornstarch mixed with 2 tablespoons cold water and cook for 1 minute until thickened. 💧
Pressure Release Issues
Never quick-release if you see steam or hear hissing—this is dangerous! Always let pressure release naturally for 10 minutes first. If your cooker isn't sealing properly, check the rubber gasket for debris and ensure the lid is locked tightly.
I recommend Instant Pot's 6-quart model for reliable sealing. If pressure builds too slowly, reduce cooking time by 2-3 minutes—modern cookers vary slightly in performance. ⚡
Burnt Onions
Onions burn when left unattended. Sauté them over medium heat (not high) and stir every 30 seconds until softened. For extra insurance, add 1 tablespoon water when they start to caramelize—this prevents burning while keeping them flavorful.
I like to cut onions into ½-inch pieces for faster cooking without burning. 🧅
Uneven Cooking
If some beef is undercooked while other pieces are falling apart, your cubes weren't uniform. Cut all beef to exactly 1.5 inches—use a ruler for precision. Stir the pot halfway through cooking to distribute heat evenly.
For stubborn tough spots, remove those pieces and cook them separately for 2-3 extra minutes before returning to the pot. 🔥
Nutrition facts
Frequently asked questions
Can I use ground beef instead of chuck roast in this recipe?
Ground beef works but won't have the same tender texture. For best results, stick with chuck roast cut into 1.5-inch cubes—it breaks down beautifully under pressure. If you must use ground beef, cook it separately after pressure cooking the noodles and vegetables to avoid a greasy texture.
What type of noodles work best in a pressure cooker?
Egg noodles (like Barilla or De Cecco) hold up best—they absorb flavor without turning mushy. Avoid thin rice noodles or delicate pasta varieties. For extra heartiness, try whole wheat egg noodles or even udon noodles (cook them 2 minutes less than package instructions).
How do I adjust this recipe for a 6-quart vs. 8-quart pressure cooker?
For a 6-quart model, reduce beef to 1 lb and noodles to 6 oz—keep all other ingredients the same. In an 8-quart, you can double the recipe (just increase cooking time by 5 minutes). The key is maintaining the same ratio of beef to broth to vegetables. Always leave 1-inch headspace for proper pressure building.
Can I make this recipe without Worcestershire sauce?
Yes! Substitute with 1 tbsp soy sauce + ½ tsp balsamic vinegar for depth. For a vegetarian version, use 1 tbsp soy sauce + ½ tsp liquid smoke. The Worcestershire adds umami, but these combos work in a pinch. Taste as you go—this dish should be savory and balanced.
Why does my pressure cooker take longer to build pressure?
This happens with newer models or if the lid isn't sealed properly. Check for debris on the rubber gasket and ensure the lid is locked tightly. If your cooker is older than 5 years, parts may wear out. For safety, never exceed the manufacturer's recommended fill line—overfilling delays pressure buildup.