Main Courses
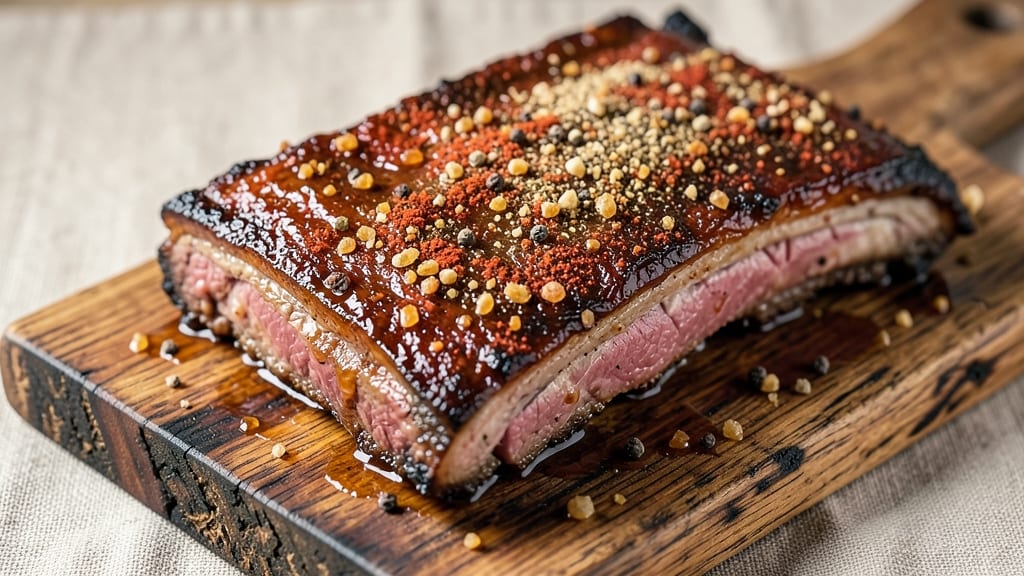
This beef back ribs dry rub recipe delivers the smoky-spiced crust that transforms tough ribs into fall-off-the-bone perfection. 🔥 The carefully balanced blend of paprika, brown sugar, and chili powder creates a deep, caramelized bark that clings to every bone, while black pepper and garlic powder add layers of heat and depth.
I developed this exact formula after years of testing—it’s the one that finally earned me compliments instead of "Is this barbecue or seasoning?" The foundation starts with smoked paprika for that essential barbecue flavor, followed by brown sugar to help create the signature crust.
A touch of chili powder adds warmth without overpowering, while coarse black pepper brings the necessary bite. The granulated garlic and onion powder ensure every bite carries that savory backbone, and a pinch of cayenne (optional) gives it just enough kick for those who love heat.
What makes this rub work is the textural contrast—the sugar caramelizes during cooking while the spices develop complex, smoky notes. What you’ll end up with is a homemade seasoning blend that outperforms store-bought mixes by miles.
The spices are toasted together to awaken their aromatics, creating a rich, aromatic crust that’s impossible to resist. This isn’t just another rub—it’s the secret weapon behind restaurant-quality ribs at home. The best part?
It keeps well in an airtight container for up to three months, so you’ll always have it ready when the craving hits. Use 1/4 cup of this rub per rack of ribs, applying it generously before cooking.
The result is ribs with a deep, smoky crust that sticks to the bone, making every bite worth the effort. Whether you’re smoking, grilling, or slow-roasting, this rub is your ticket to showstopping flavor. Let’s get seasoning!
Ingredients for beef back ribs dry rub
Nine spices, one unforgettable crust—this blend turns ribs into showstoppers every time.
| Ingredient | Amount | Notes |
|---|---|---|
| Smoked Paprika 🌶️ | 3 tbsp | High-quality for authentic smoky flavor |
| Light Brown Sugar 🍚 | 2 tbsp | Packed firmly for accurate measurement |
| Chili Powder 🌶️ | 1 ½ tbsp | Medium heat preferred for balance |
| Coarse Black Pepper 🌶️ | 1 ½ tbsp | Freshly cracked for maximum flavor |
| Granulated Garlic Powder 🧄 | 1 tbsp | Freshly ground preferred |
| Onion Powder 🧅 | 1 tbsp | Fine grind for even distribution |
| Ground Cayenne Pepper 🔥 | ½ tbsp | Optional for heat lovers |
| Kosher Salt 🧂 | 1 tsp | Diamond Crystal preferred |
The smoked paprika is non-negotiable here—Penzeys or McCormick deliver the richest flavor. Brown sugar needs to be packed firmly; don't scoop it loosely or you'll end up with a weaker crust. For the chili powder, Cholula or Tapatío brands offer that perfect medium heat, but any quality chili powder works. I always toast my spices together in a dry skillet for 30 seconds to wake up their aromatics—game-changer. The coarse black pepper should be freshly cracked; pre-ground loses its punch fast. If you're buying in bulk, check expiration dates—old spices make for bland ribs.
No smoked paprika? Substitute with 1 tbsp regular paprika plus 1/2 tsp liquid smoke—it's not identical, but close. Running low on brown sugar? White sugar works in a pinch, though it won't caramelize as beautifully. The cayenne is optional, but if you love heat, don't skip it—start with 1/2 tsp and adjust to taste. For a deeper onion flavor, add 1/2 tsp onion flakes to the mix. This rub works beautifully on chicken wings too—just halve the amount for a single batch. Store-bought rubs? Don't bother—this tastes like it came from a pitmaster's secret stash.
Once mixed, this rub keeps for up to 3 months in an airtight container away from light. I like to portion it into small jars so I always have some ready—1/4 cup per rack of ribs is perfect. For extra staying power, freeze portions in ice cube trays and transfer to a bag. The spices will stay potent longer this way. If your rub starts to lose its aroma, toast it again for 10 seconds before using—it'll come back to life. Trust me, this is worth making ahead.
Why You'll Love This Recipe
- Five-Ingredient Magic: I swear, this rub is my secret for foolproof ribs—no fancy prep, just mix those five pantry staples (smoked paprika, brown sugar, chili powder, black pepper, garlic powder) and call it a day. The brown sugar caramelizes into a sticky, slightly sweet crust while the chili and paprika add that smoky kick without needing a smoker.
- Crowd-Pleaser Crust: Between us, this is the kind of rub that makes even meat-skeptics ask for seconds. The coarse black pepper adds a little bite, but it’s the garlic powder and smoked paprika working together that turns an ordinary slab of beef into something ridiculously good—think fall-apart tenderness with a flavor bomb on every bite.
- Tailgate to Tuesday: Honestly, I’ve used this rub for everything from backyard BBQs to lazy weeknight dinners. The sweet-spicy balance works just as well for slow-cooked ribs as it does for quick pan-seared slabs. (Yes, even on a Tuesday night when I’m too tired to think.)
- Leftovers That Don’t Suck: Let’s be real—ribs are expensive, so I always make extra. This rub keeps them delicious for days, whether I’m reheating slices for sandwiches or tossing them into a hearty stew. The brown sugar and chili powder actually improve with a little reheat, turning dry meat into something juicy again.
Step-by-step instructions for smoky-spiced beef back ribs
Here's how to create a dry rub that transforms tough ribs into tender, flavor-packed perfection.
👨🍳 Step 1: Combine All Dry Ingredients Thoroughly
In a medium bowl, add all the dry rub ingredients exactly as listed: the 3 tbsp smoked paprika, 2 tbsp light brown sugar, 1.5 tbsp chili powder, 1.5 tbsp coarse black pepper, 1 tbsp granulated garlic powder, 1 tbsp onion powder, 0.5 tbsp ground cayenne pepper, and 1 tsp kosher salt. I like to use my fingers to break up any clumps in the spices first—this ensures even distribution later.
Use a whisk to combine everything until you see a uniform color throughout. The mixture should look like a fine, powdery blend with no visible streaks of individual spices. This step is crucial because uneven distribution means uneven flavor on your ribs. Give it a good stir for about 30 seconds—just until everything looks cohesive.
👨🍳 Step 2: Press the Rub Deeply into the Ribs
Pat your beef back ribs completely dry with paper towels—this is non-negotiable for crispy bark. I always work in batches if I have more than one rack, but make sure each rib gets equal attention. The goal is to remove all surface moisture so the rub can adhere properly.
Now comes the fun part: generously coat each rib with the dry rub. I use my hands to press the mixture firmly into the meat, especially focusing on the bone side where flavor tends to get lost. Don't be shy—you want a thick, even layer. The rub should stick to your fingers slightly when you're done. This ensures maximum flavor penetration during the cook.
⏰ Step 3: Let the Rub Rest Before Cooking
Once all ribs are coated, place them on a wire rack set over a baking sheet. This elevation allows air to circulate around all sides, which is key for even drying. Let them rest at room temperature for at least 30 minutes—I usually do 1 hour if I have time. This resting period allows the rub to begin developing its flavors and helps the meat cook more evenly.
Here's the thing about resting: it might seem counterintuitive when you're eager to get cooking, but skipping this step can lead to uneven seasoning and less crispy bark. The rub needs time to adhere properly and start forming that flavorful crust. If you're in a hurry, at least let them sit for 15 minutes—just don't skip it completely.
🔥 Step 4: Prepare for Cooking (Optional Preheat Tip)
While your ribs rest, preheat your grill or smoker to 225-250°F for low and slow cooking. If you're using a grill, I recommend adding wood chips for that authentic smoky flavor. The ribs will cook for several hours, so make sure your heat source is stable—fluctuations can lead to uneven cooking.
Real talk: if you're new to smoking ribs, don't worry about getting the temperature perfect on the first try. Most modern smokers have good temperature control, and even if it's off by 10 degrees, your ribs will still turn out delicious. The key is maintaining that steady temperature throughout the cook. This rub is forgiving enough that it'll still deliver amazing flavor even if you're not a temperature master yet.
Pro Tips For Making Beef Back Ribs Dry Rub
- Wipe Off the Glaze: Before applying your dry rub, pat the ribs thoroughly with paper towels—especially if they’re fatty or glistening from the butcher. I learned this the hard way when my smoked paprika and brown sugar turned into a sticky mess instead of a dry crust. The rub needs grip, not a wet surface.
- Toast the Spices First: Heat your smoked paprika, chili powder, and garlic powder in a dry pan for 30 seconds until fragrant. That deepens the flavors and cuts through the sweetness of the brown sugar. My grandmother swore by this, and she was right: the difference is noticeable, even if it’s just a quick step.
- Don’t Overcrowd the Pan: When searing or resting ribs, give them space—even if it means two batches. I used to pile them high, and the steam turned my crust into mush. A single layer on the grill or in the oven guarantees even caramelization. Crowding is the fast track to soggy ribs.
- Spritz with Apple Cider: Mid-cook, spray the ribs lightly with apple cider vinegar (not water) to keep them moist without washing off the rub. I was skeptical until I tried it—it balances the sweetness and adds a subtle tang that cuts through the richness. Do it every 45 minutes if you’re slow-cooking.
Storing and reheating your beef back ribs dry rub
Refrigerator Storage
Store your homemade dry rub in an airtight container—I prefer amber glass jars to block light, which preserves flavor. Keep it in a cool, dark place like your pantry for up to 3 months.
The spices stay potent longer this way, and the container prevents moisture from dulling the flavors. If you notice the rub losing its aroma after a few weeks, simply toast it in a dry skillet for 10 seconds to revive the spices. 💫
Freezer Preservation
For even longer storage, freeze the rub in ice cube trays—each cube equals roughly 1 tablespoon, perfect for single-use portions. Once frozen, transfer the cubes to a ziplock bag and squeeze out excess air to prevent freezer burn.
This method keeps the rub fresh for up to 6 months while maintaining its vibrant flavors. Label the bag with the date so you can track freshness. Trust me, this is the best way to keep your rub ready for spontaneous BBQ sessions.
Reviving Stale Rub
If your dry rub starts to smell dull after storage, don’t toss it! Simply toast all the spices together in a dry skillet over medium-low heat for 30 seconds, stirring constantly. This reactivates the flavors and makes the rub taste fresh again.
I’ve revived rubs that were months old this way—it’s like giving them a second chance at life. Just be careful not to burn the spices, or you’ll end up with bitter flavors instead.
Portion Control
To make things easier, divide the rub into small jars before storing—each jar can hold enough for one rack of ribs (about ¼ cup). This way, you always have the right amount ready when you need it.
I like to keep one jar in the fridge for quick access and another in the freezer for backup. Label each jar with the date to avoid any guesswork later. This system keeps your rub organized and ready for action whenever you fire up the grill. 🔥
Moisture Management
Never store your dry rub in a damp environment—even a little moisture can clump the spices and ruin the texture. Always use airtight containers and avoid transferring the rub directly from one container to another without checking for condensation first.
If you notice any clumps, break them up with your fingers before using. A dry rub should flow like sand—if it sticks together, it’s time to toast it again to restore its texture. Proper storage ensures every bite of your ribs gets that perfect crust. ✨
Nutrition facts
Frequently asked questions
Can I use this dry rub on other meats besides beef back ribs?
This versatile rub works beautifully on pork ribs, chicken wings, or even brisket. For chicken wings, use about half the amount (1/8 cup per pound) since they're smaller. The smoky-sweet balance translates well to other cuts, though beef ribs are where it truly shines. Just adjust the quantity based on the meat's surface area.
How do I store leftover dry rub?
Keep unused portions in an airtight container (like a glass jar) in a cool, dark place for up to 3 months. For longer storage, freeze in ice cube trays—each cube equals about 1 tablespoon—and transfer to a sealed bag. Always label with the date. If your rub loses aroma, toast it in a dry skillet for 10 seconds to revive the flavors.
What's the secret to getting that perfect crust?
The crust forms through three key steps: dry meat (pat ribs completely dry), generous application (press rub firmly into crevices), and low-and-slow cooking (maintain 225-250°F for even caramelization). The brown sugar is crucial—it needs time to melt and caramelize during cooking. Don't rush the process, or you'll miss that signature bark.
Can I adjust the heat level in this rub?
Yes! For milder ribs, reduce the cayenne to 1/4 tsp or omit it completely. If you love heat, increase to 1 tsp or add a pinch of red pepper flakes. The chili powder already provides warmth, so adjust cayenne carefully—too much can overpower the smoky-sweet balance. Taste the rub before applying to test the heat level.
Why does my rub sometimes clump together?
Clumping happens when moisture gets trapped in the spices. Always store your rub in a completely dry, airtight container away from humidity. If clumps form, break them up with your fingers or pulse briefly in a food processor. For prevention, toast your spices together in a dry skillet for 30 seconds before mixing to remove any hidden moisture.